How to Identify Intervals by Ear: A 10-Minute Daily Plan
You’re listening to a song you love, humming along fine, then the singer takes a big leap and you’re lost. You can hear the notes moved far apart. You just can’t find that second note on your guitar, piano, or voice.
That’s not a theory problem. It’s a hearing problem, and it’s trainable. Learning how to identify intervals means learning to hear the distance between two notes directly, so you can play by ear instead of hunting and guessing.
Table of Contents
- Interval Reference Chart Every Ear Trainer Needs
- Why Hearing Intervals Is a Skill You Can Train
- Four Stages From Comparing to Naming Intervals
- Your 10-Minute Daily Ear Training Routine
- Hearing Intervals Inside Real Songs and Melodies
- Mistakes That Stall Interval Progress and How to Fix Them
- Start Your First Interval Session Today
Interval Reference Chart Every Ear Trainer Needs
A chart is a map of distances. It does not hear for you. Keep it beside your instrument. Read the semitone count first, then use the song cue and the sound character so the gap itself becomes familiar.
| Interval | Semitones | Reference song cue | Sound character |
|---|---|---|---|
| Minor 2nd | 1 | Jaws theme | tense, close |
| Major 2nd | 2 | Happy Birthday (“Hap-py” up to “birth-day”) | open, step-like |
| Minor 3rd | 3 | Greensleeves (opening) | dark, sad |
| Major 3rd | 4 | When the Saints Go Marching In | bright, happy |
| Perfect 4th | 5 | Here Comes the Bride | open, stable |
| Tritone | 6 | Maria (West Side Story) | unstable, tense |
| Perfect 5th | 7 | Star Wars main theme | strong, hollow |
| Minor 6th | 8 | Where Do I Begin (Love Story), opening rise | dark, longing |
| Major 6th | 9 | My Bonnie Lies Over the Ocean (first two notes) | warm, sweet |
| Minor 7th | 10 | Somewhere (West Side Story), “There’s a” | bluesy, pulling |
| Major 7th | 11 | Bali Ha’i (opening “Ba-li”) | leaning, almost resolved |
| Octave | 12 | Somewhere Over the Rainbow (opening) | same note, higher |
How to read the numbers
A semitone is the smallest step on a piano, from one key to the very next one. A minor 2nd is one semitone. An octave is 12.
Musicians also measure finer differences in cents. A psychoacoustic study of interval discrimination notes that one semitone equals 100 cents and an octave equals 1,200 cents, and it found the clearest consistent advantage for 13 musicians over non-musicians around 100-125 cents, about one semitone.
You do not need cents on day one. They matter later, when two close intervals keep blurring together and the song cue is no longer enough to separate them.
Use song cues the right way
A song cue works like a sticky note on a jar. It helps you grab the sound today. It is not the contents.
The opening of Somewhere Over the Rainbow can make an octave obvious in that key. Songs get transposed. In a new key, or from a new starting note, a memorized tune can send you to the wrong name, because you remembered the melody instead of the distance.
A drill can look successful for weeks: same cue, same starting pitch, fast correct labels. Then a chorus leaps from a different note and the label vanishes. That is a transfer miss, not a bad ear. Before you leave a row, sing that interval from three different starting notes, away from the reference song. If the name only appears when the cue song plays, stay on that interval.
Practical rule: Sing the interval before you name it. If you cannot sing the distance, you have not heard it yet.
Your first practice action
Try one interval at a time:
- Play it: Play the two notes on piano or your instrument, low note first.
- Sing it: Sing the reference melody, then sing just the two notes from a new starting pitch.
- Say it: Say the name aloud, like “perfect fifth,” before you check the chart.
If the names still feel slippery, the guide on what musical intervals are walks through the terms in plain language.
Finish with a transfer check, not a speed check. Name three intervals in a row correctly, each from a different starting note, and none of them cued by its reference song. Until you can do that, stay with the chart. You are building a sound library, and that library only counts when it works inside real music.
Why Hearing Intervals Is a Skill You Can Train
Most beginners start by counting. They count letter names, then count semitones on paper, then try to work out the name.
That turns an interval into a slow code. By the time you’ve decoded it, the song has moved on.
Hear distance, don’t decode it
The shift you’re aiming for is simple. You hear two notes and you feel how far apart they are, the way you can feel whether someone is standing close to you or across a room.
Counting still has a job. It checks your answer after you’ve heard the sound. It shouldn’t replace hearing.
You don’t need perfect pitch to do this. You need a repeatable loop: hear, answer, get feedback, repeat.
What happens with steady practice
A controlled study of 25 high-school students with limited musical backgrounds used an ear-training system during an eight-week interval-recognition program, and scores improved significantly, with t(24) = 2.831 and p = .013.
Those students weren’t selected for natural gift. They followed a loop: hear an interval, try to reproduce or name it, receive feedback, and repeat over time.
That’s the same loop explained in our post on why interval training works. The improvement came from structured repetition, not from being born with a special ear.
What this sounds like in real playing
Say you’re singing at a wedding and the melody leaps up a fourth. If you’ve trained that sound, you don’t stop to count. You hear “Here Comes the Bride” distance, you land on the note, and you keep singing.
A guitarist does the same thing on the fretboard. The leap has a shape and a sound, so the hand goes to the right place without tabs.
Ten focused minutes a day, repeated for weeks, beats one long guess-filled session. You’re training a muscle. Short, frequent work is how it grows.
Four Stages From Comparing to Naming Intervals
A learner can sort a minor third from a major third in a drill, then freeze when the same leap shows up in a recorded chorus. The score looked fine. The hearing never left the exercise.
Size comes before the name. Blocked practice, repeating one interval type, makes that size familiar. Interleaved practice, mixing types, checks whether you still hear it when the order changes. A song is the last check. If the label only works inside the drill, the interval is not learned yet.
This chart shows the flow from comparing to naming.
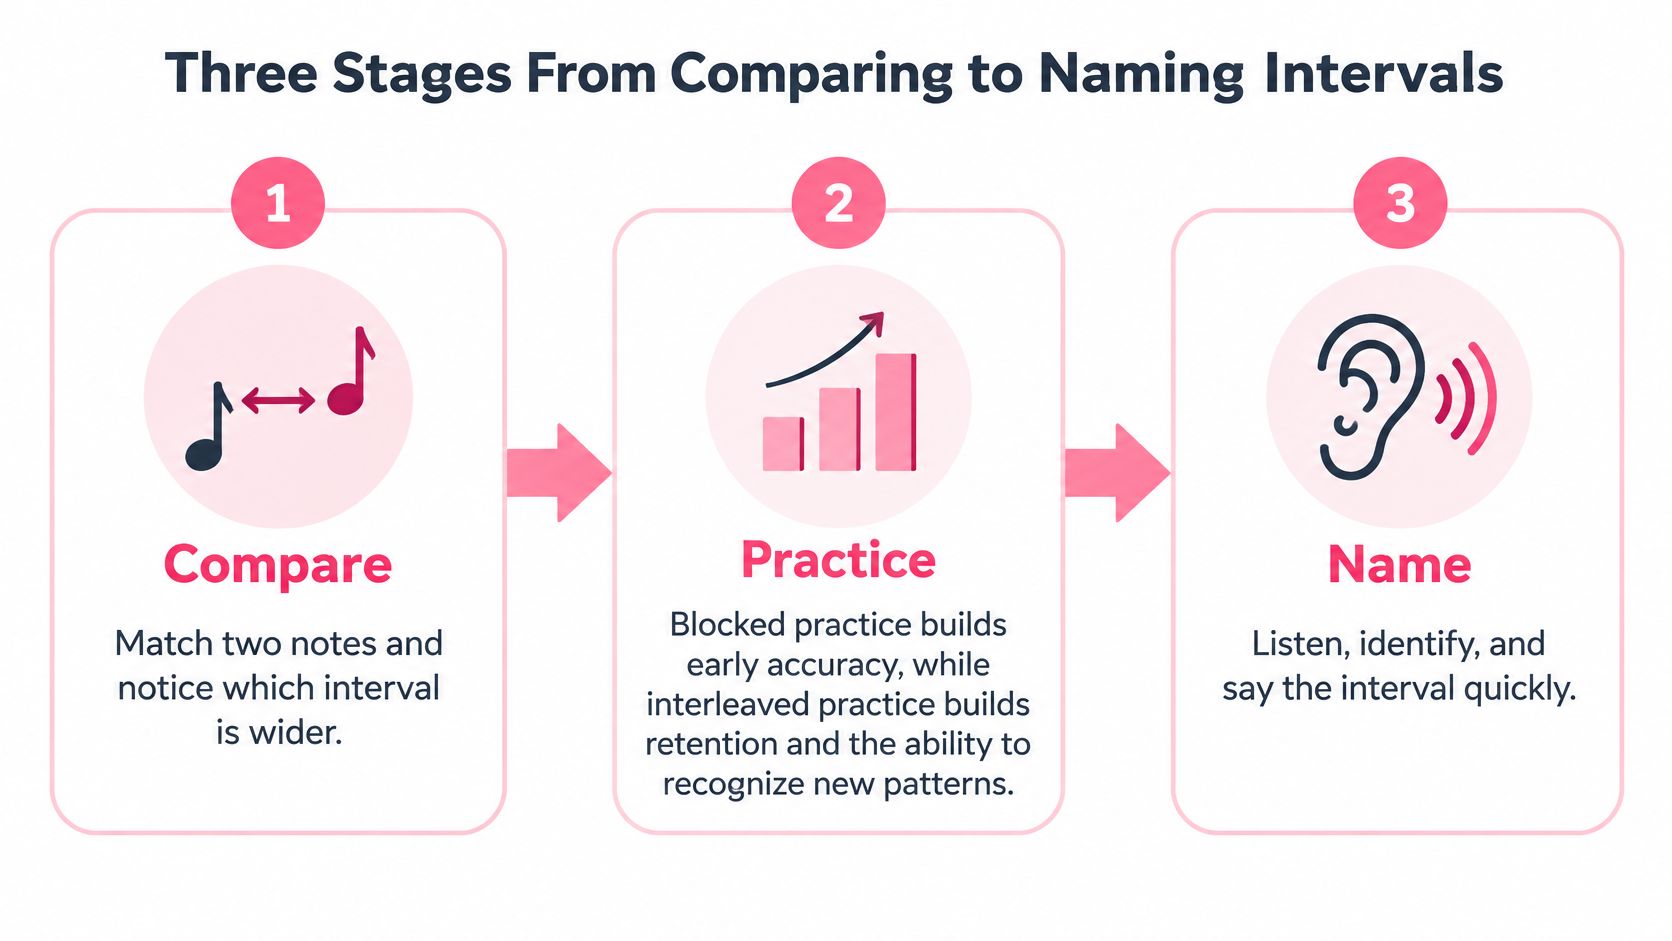
Stage 1 Compare which one is wider
Play two intervals. Say whether the second is wider, narrower, or the same size.
Start with the octave, perfect fifth, and perfect fourth. They are large and stable, so the gap is easier to hear than the small space between seconds and thirds. You are sorting distances before you read any label.
A study on interval comparison and identification found that training interval comparison improved identification of the same intervals, while continuous identification practice alone produced no measurable learning in one experiment. Comparison teaches size first. The name sits on top of that size.
Stage 2 Label a small set
Name intervals only after those sizes feel distinct. Use three or four types, and stay with one until its contour is familiar.
Hear the two notes, sing them softly, then answer. A reference note turns the task into measuring, so leave it out.
Take minor 3rd, major 3rd, perfect 4th, and perfect 5th. Stay with the minor 3rd until that darker sound is obvious on its own. Mix the others in after that.
Stage 3 Mix everything up
Random order shows whether you memorized the drill or heard the interval.
Change the starting note, so you are not always beginning on C or on the same guitar string. Move the same interval higher and lower. Switch timbre: piano one day, guitar or voice the next. Keep separate results for ascending, descending, and harmonic versions.
Harmonic means both notes at once. That version often feels harder, and a combined average can hide the miss. Track it on its own.
Stage 4 Use real music
Pick a recorded melody. Name the leap, then find that interval on your instrument before you play the recording again.
One high score can be luck. Watch a rolling average across several sessions, and retest after a delay. If the leap is gone the next day, it was not learned yet. Move on only when the sound still shows up in music you did not drill.
| Stage | Intervals in play | Task | Pass mark before advancing |
|---|---|---|---|
| 1. Compare | Octave, perfect fifth, perfect fourth | Hear two intervals and say which is wider | Mostly correct across three sessions |
| 2. Label | Three or four interval types at a time | Name each interval without a reference note | Mostly correct, with quick responses |
| 3. Mix | All intervals up to an octave | Random order, new starting notes, registers and timbres | Mostly correct on melodies you have not drilled, still there the next day |
| 4. Real music | Intervals inside melodies | Name the leap in a recorded tune, then find it on your instrument | Melody found without checking the recording |
Your 10-Minute Daily Ear Training Routine
You don’t need an hour. You need ten minutes you can repeat tomorrow, and the day after that.
This visual breaks one session into four timed blocks.
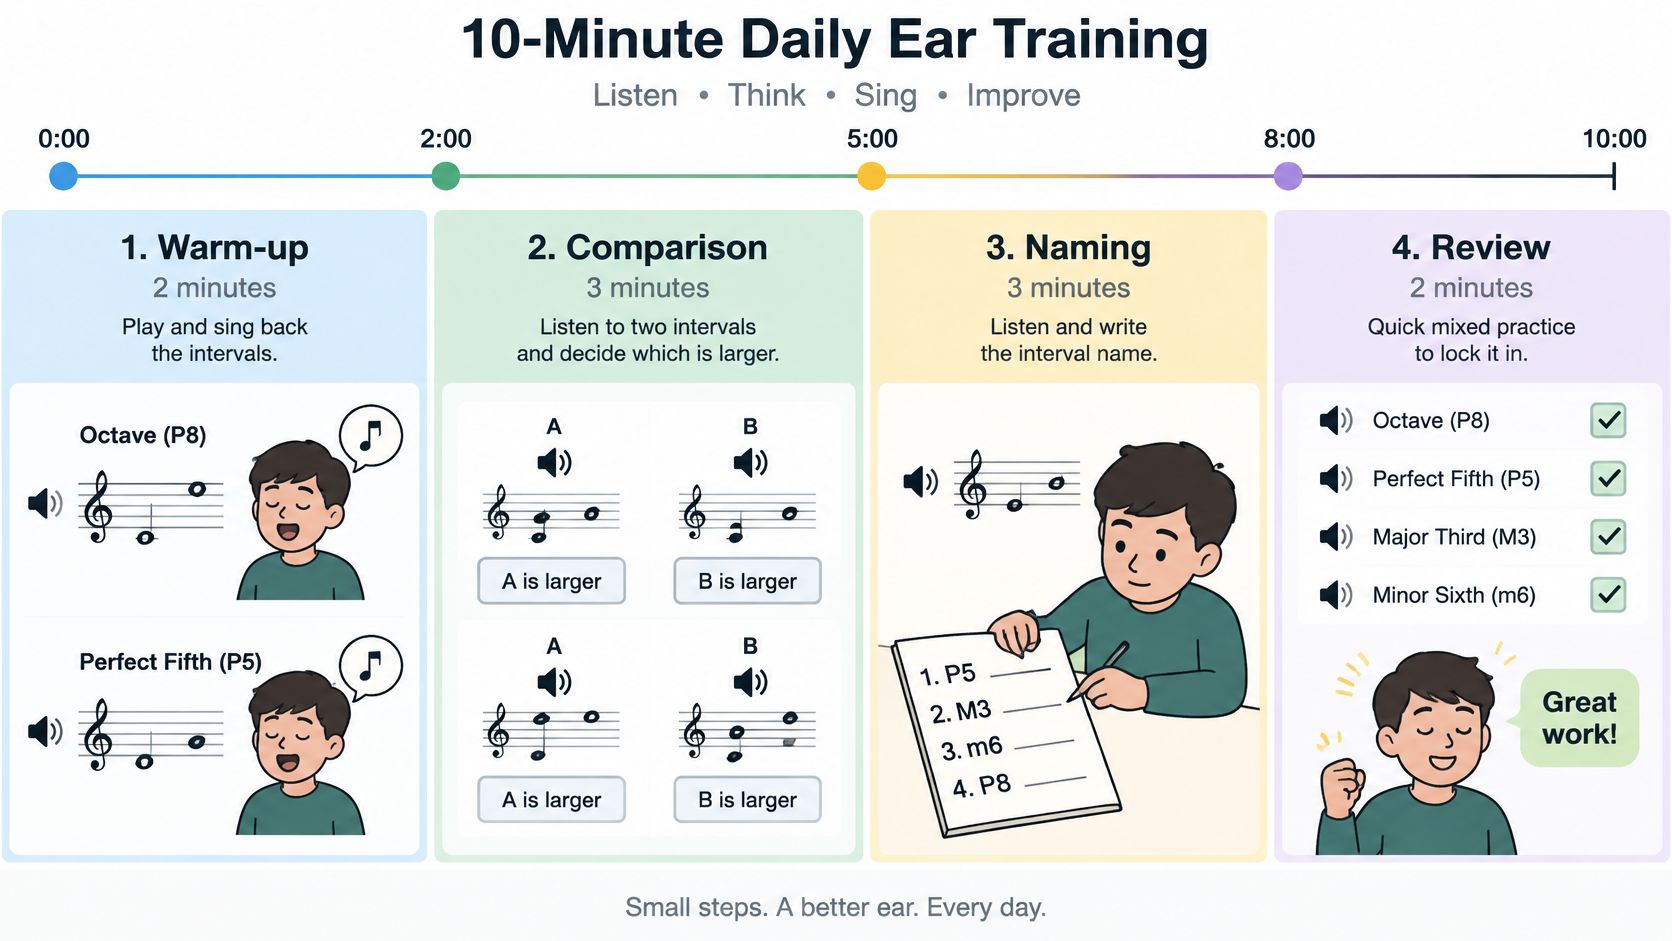
The four blocks
- Warm-up, 2 minutes: Play an octave and a perfect fifth. Sing each one back, low to high, then high to low.
- Comparison, 3 minutes: Hear pairs of intervals and say which is wider. Answer out loud before you check.
- Labeling, 3 minutes: Name today’s small interval set without a reference note. Keep it to three or four types.
- Sing back, 2 minutes: Hear a short phrase, sing it back, locate it on your instrument, then improvise a short answer using the same movement.
The order matters. Sound comes before sight, so hearing comes first and naming follows. You finish by making music, not by filling in a quiz.
Our training sessions follow that same short loop: you hear a sound, you answer, and you get instant feedback. That feedback tells you what to fix while the sound is still fresh.
Why short sessions work
A review of research on beginning instrumentalists describes a study with 10-15 minutes of ear-playing exercises involving tonal patterns, rhythm patterns, and improvisation, where students achieved higher etude-performance scores than learners taught exclusively through notation exercises. It also describes a controlled study of 28 beginning musicians who improved significantly in ear-playing ability through ear-playing strategies rather than notation-only instruction.
Watch this short session in action before you try your own.

A realistic week
Say you’re a guitarist working on the minor third. Drill it alone for three days during the labeling block. On day four, mix it with the perfect fourth and perfect fifth so you have to choose.
Keep one fixed time each day, and log the result in one line. If you miss a day, do ten minutes the next day. Don’t double up to punish yourself.
A good session has a clear sign. Answers come a little faster than last week, and your mistakes shrink to one confusing pair instead of everything.
Hearing Intervals Inside Real Songs and Melodies
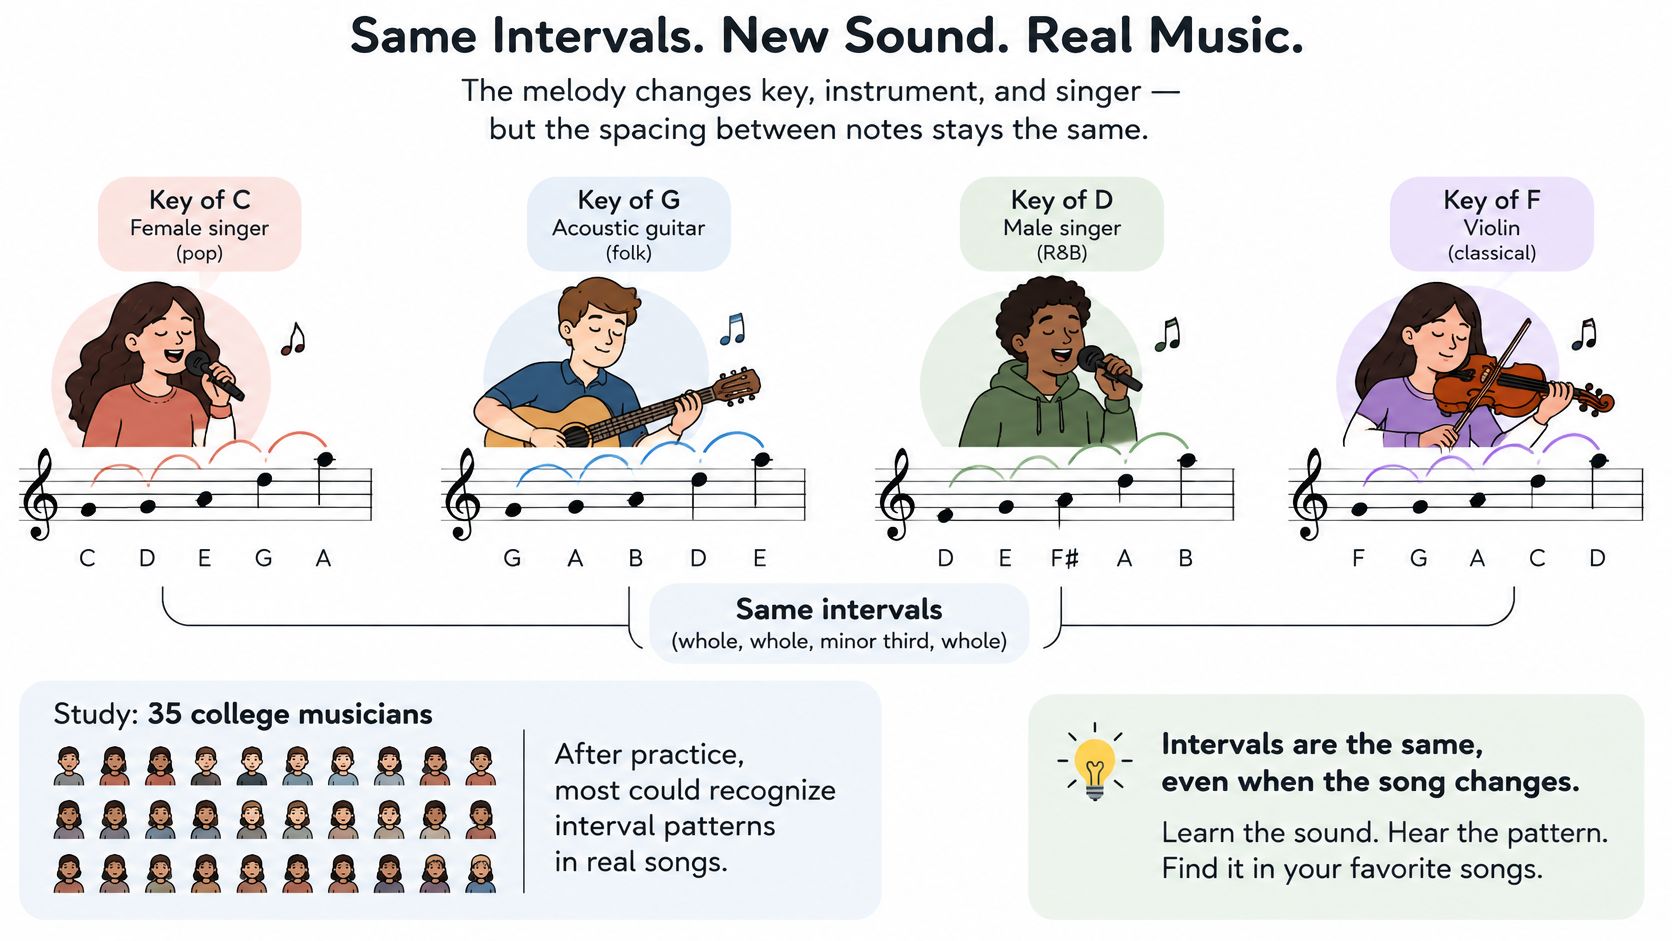
Isolated drills leave a gap. In a real song, the notes change when the key, instrument, or singer changes.
The steps between the notes don’t change. A chorus that moves up a fifth, down a step, then up a third keeps that shape in any key.
This image shows why that shape stays useful across settings.
Why this skill sits under playing by ear
In a study of 35 college musicians, performance on an interval-identification test significantly predicted melodic-dictation scores, accounting for 28.9% of the variance after musical-experience variables were controlled.
In plain terms, nearly three-tenths of the difference in how well people wrote down melodies they heard was linked to how well they identified intervals. That’s a big share for one skill. It’s why interval work supports transcription, chord recognition, and finding melodies without a chart.
A four-step method for any song
- Hum the phrase: Pick a song you know well and hum the first phrase without your instrument.
- Name each leap: Call each move a second, third, fourth, fifth, or larger, and note up or down.
- Find the first note: Locate only the starting note on your instrument.
- Build from intervals: Play the rest from the distances you named, then check the recording.
In a rehearsal, this is the moment a singer changes key and the band follows. You’re not chasing absolute notes. You’re following the shape.
Our collection of interval songs for practice gives you more phrases to try this with. Remember, a memorized opening cue only works in its original key, so always rebuild from the first note you find.
Take the intervals from a phrase you just learned and answer them in a new rhythm. Keep the contour, change the timing. That’s the start of improvisation.
The outcome you’re after is musical freedom. You hear a chorus or a solo line, you map the leaps, and you play it without sheet music in front of you.
Mistakes That Stall Interval Progress and How to Fix Them
The most common stall feels unfair. You score well today, then drop tomorrow.
That usually means you memorized an answer pattern from one key. You learned where answers tend to fall in that drill, not how distance sounds.
Change the starting notes and retest after 24 hours. If the score holds, you learned it. If it falls, repeat the stage with more variety.
| Symptom | Likely cause | Fix |
|---|---|---|
| Correct on rising intervals, misses descending ones | Practice used only ascending tones | Add descending pairs and short melodic fragments |
| Confuses major and minor thirds | Relying on timbre or loudness, not pitch distance | Use one instrument at equal volume and compare pairs |
| Misses intervals 25-75 cents apart | Pitch resolution not built yet | Start with differences of 100 cents or more, then narrow |
| Good score today, lower tomorrow | Memorized an answer pattern from one key | Change starting notes and retest after 24 hours |
| Counts semitones but still guesses | Counting replaces hearing | Hear the sound first, then count only to check |
Go through the fixes one by one
Descending misses need descending practice, not more ascending drills. Play the high note first, sing down, and use short melodic fragments so the drop feels like real music.
Major and minor third confusion often comes from listening to brightness of the instrument instead of pitch distance. Use one instrument, keep the volume equal, and compare the two thirds back to back from the same starting note until the size difference is clear.
Very close intervals are the hardest case. Start with differences of about 100 cents, roughly one semitone, and narrow only after you pass. Jumping to tiny differences too early just trains guessing.
Control your listening setup
Timbre and loudness can make two identical intervals sound different. Compare on one instrument at equal volume when you’re diagnosing an error.
If you use hearing aids, live with tinnitus, practice in a noisy room, or rely on weak headphones, the same control matters even more. Practice in a quiet room, use clean headphones, and set the volume before each session so the sound is steady.
Feedback rule: Every correction should name both direction and size. “Up a major third” teaches more than “wrong.”
When to add difficulty
Don’t expand after one high score. Add a new interval type only after the current set passes across several sessions, in new keys and registers.
If you add too much too soon, every answer feels like a coin flip. If you add one thing at a time, your ear always has something solid to stand on.
Start Your First Interval Session Today
You have ten free minutes before dinner. Sit down, play two notes, and name the distance between them before you look up the answer.
Run the routine yourself: warm-up, comparison, labeling, then sing-back. Keep the set small. Sing the interval before you name it, and write the score down.
Trill: Ear Training Daily is built as a 10-minute daily ear training system covering chords, intervals, perfect pitch, and melodies, so you can run the routine alongside its short daily sessions. Its interval training asks you to name any two notes by ear. Streaks, XP, and badges bring you back, and a progress dashboard shows accuracy and speed improving session by session. You hear a sound, answer, and get instant feedback.
Use that record as your log. A clean score on the same pair can look like progress while that jump still disappears inside a song. Watch whether you reach the pass marks and whether answers get faster across several days, not whether one session felt easy.
Then follow these steps:
- Run it for seven days: Same time, same ten minutes.
- Compare day seven with day one: Check accuracy and speed.
- Advance only after passing: Move stages when the mark holds across several sessions.
- Use one real song each week: Find its intervals by ear, then check the recording. If the drill is clean and the song is still a guess, stay on the current set until the song matches.
Hearing intervals grows with repetition, feedback, and real songs. A label you can recite in a quiet drill is a different skill from hearing that distance in a melody.
Start hearing distances with Trill: Ear Training Daily, where short daily interval, chord, and melody sessions give you instant feedback and a clear record of accuracy and speed. Do your first ten minutes today, name two notes by ear, and build the streak that turns practice into playing by ear with confidence.