Master the Chromatic Scale on Piano: Play by Ear

You sit down at the piano, hear a little passing run in a song, and know it matters. It sounds slick, expressive, almost vocal. But when you try to copy it, your fingers hesitate, your hand tightens, and the notes blur together.
That’s where the chromatic scale on piano stops being an exam exercise and starts becoming useful.
Most players learn chromatic scales as a fingering problem. That’s too small a frame. The chromatic scale is every note available to you, arranged in the smallest possible steps. When you learn to hear it as clearly as you play it, you stop guessing. You start recognizing tension, motion, color, and the little connecting notes that make real music feel alive.
If your goal is to play by ear, improvise more confidently, and build the kind of listening people sometimes call perfect pitch, this scale deserves daily attention. Not because it’s flashy, but because it trains the link between your hands and your ears.
Table of Contents
- Why the Chromatic Scale Is Your Secret Musical Weapon
- Understanding the Sound Before You Play a Note
- Chromatic Scale Fingering That Actually Works
- Your Daily 10-Minute Chromatic Practice Routine
- Connecting Your Fingers to Your Ears
- From Mechanical Scale to Musical Freedom
Why the Chromatic Scale Is Your Secret Musical Weapon
A lot of pianists feel trapped by written music. They can play what’s on the page, but if a singer changes a phrase, or a melody slips through with a few spicy passing tones, they freeze.
The chromatic scale helps fix that.
It gives you the full map. Not just the “safe” notes of one key, but every available color between one note and the next. That matters because real music rarely moves in neat, classroom-only shapes. Melodies slide. Bass lines creep. Chords get approached from above or below. Good improvisers hear those in-between notes and use them on purpose.

It’s more than a finger drill
If you only practice the chromatic scale as a speed test, you miss the best part.
Used well, it helps you:
- Hear tension clearly so passing notes in songs stop sounding random
- Move between chords smoothly when you improvise or accompany someone
- Copy melodies by ear because you recognize step-by-step motion faster
- Add expressive detail without relying on sheet music for every note
That last point matters most. Musical freedom doesn’t come from memorizing more rules. It comes from hearing what’s happening and having your hands ready to answer.
Practical rule: Treat the chromatic scale as your palette, not your punishment.
A useful companion to this mindset is this guide to music theory scales and ear training. It helps connect scale patterns to actual listening, which is where scales become musical instead of mechanical.
Why ear-first players should care
When students tell me they want to play by ear, they usually mean something simple. They want to hear a line and find it quickly. They want chords to make sense. They want less hesitation.
The chromatic scale supports all of that because it trains your ear to track the smallest distance in Western music. Once that tiny movement becomes familiar, melodies stop feeling foggy. You start noticing exactly how a note leans into the next one.
That’s why this scale is a secret weapon. It doesn’t just make your fingers faster. It sharpens your hearing.
Understanding the Sound Before You Play a Note
A student sits at the piano, plays every note from C to C, and still has no idea what they just heard. That happens all the time. The fingers move correctly, but the ear never joins the lesson.
Start with the sound.
A chromatic scale is all 12 notes inside the octave, played one after another with no gaps: C, C#, D, D#, E, F, F#, G, G#, A, A#, B, then C again. Major and minor scales skip certain notes. The chromatic scale does not, and that is exactly why it is so useful for ear training.
On piano, every step in a chromatic scale is a half-step. That means you move to the nearest key every time. Sometimes that is white to black. Sometimes black to white. Sometimes white to white, like E to F or B to C.
That tiny distance matters more than many players realize.
The half-step is easy to hear once you know what to listen for. It often sounds like pressure, pull, or a note that wants to move. In real music, that sound shows up in passing tones, blues inflections, film-score tension, jazz lines, and vocal phrases that slide into pitch instead of landing on it cold.
Sing it before you play it.
Sing C to C#. Then C# to D. Then D to D#. Use any comfortable vowel. The goal is not a polished vocal sound. The goal is to feel how close those notes are, so the keyboard stops feeling like a row of separate buttons and starts sounding connected.
If you can sing the half-step clearly, you can hear chromatic motion faster when it appears in songs.
Try this away from the piano first:
- Sing one comfortable note.
- Move up to the nearest note.
- Return to the first note.
- Repeat until the sound of that small rise and release feels familiar.
Then test it at the keyboard. Play one note, sing the next nearest note before you touch it, and check yourself. That simple habit builds the skill many players want: hearing where the line is going before the hand guesses.
I see the trade-off constantly in lessons. Students who practice chromatic scales only as finger drills may get quicker, but they often freeze when asked to copy a melody or fill in notes between chords. Students who sing and listen while they practice usually progress more slowly for a week or two, then start recognizing chromatic motion in actual music much sooner.
If you want a visual reference for the full note layout while you train your ear, use this interactive piano scale tool for chromatic note patterns.
What chromatic motion sounds like in music
Chromatic lines usually create motion rather than rest. Your ear hears them as something in progress.
Listen for chromatic movement when:
- a bass line walks from one chord root to another by nearest notes
- a melody climbs or falls one key at a time
- a singer approaches a target note from just above or below
- an improvised fill adds passing notes between stable chord tones
Players often talk about wanting perfect pitch. Relative hearing is more practical here. Recognizing one half-step quickly gives you a reliable way to hear tension, release, and direction, which is exactly what the chromatic scale is training.
Chromatic Scale Fingering That Actually Works
A student can understand the chromatic scale perfectly by ear, then still trip over it because the hand has no plan. The result is familiar. Lumpy tone, a grabbing thumb, and a line that sounds nervous instead of connected.
Good chromatic fingering gives the ear a fair chance to lead. If the hand knows where black keys and white keys belong, you can listen for evenness, direction, and tension instead of spending all your attention on survival.
The logic behind the standard pattern
For the right hand ascending from C, a reliable standard pattern is 1-3-1-3 1-2-3 1-3-1-3 1-2, repeating every octave. It lasts because it solves real physical problems at the keyboard.
Finger 3 sits naturally on black keys for many players. The thumb handles white keys cleanly. That division keeps the hand compact and reduces the last-second reaching that throws off rhythm and tone. If you want to see the layout before you drill it, this interactive chromatic scale fingering tool makes the pattern easy to track on the keyboard.
One useful technical point from a tutorial source is that the standard right-hand ascending pattern is built to keep black keys under finger 3, which is exactly why it tends to feel more stable than random fingering choices in actual practice.
Quick reference table
| Hand/Direction | Fingering Pattern |
|---|---|
| Right hand ascending from C | 1-3-1-3 1-2-3 1-3-1-3 1-2 |
| Right hand descending | Reverse the pattern carefully, keeping the same black-key organization where possible |
| Left hand ascending | Use the mirrored logic so the hand stays compact and black keys remain predictable |
| Left hand descending | Reverse the mirrored version, aiming for the same consistency of touch and spacing |
On paper, left-hand fingering can look more confusing than it feels. At the keyboard, the bigger issue is consistency. Pick a workable pattern and keep it stable long enough for the hand and ear to connect.
Start with shape, not speed
Chromatic scales fall apart when players react to each note as a separate event. The hand does better with small repeating groups.
Use these chunks:
- 1-3-1-3
- 1-2-3
- Repeat
That approach lowers mental traffic. You stop reciting numbers and start feeling a shape. Once the shape is reliable, the sound usually smooths out with it.
Memorize a hand pattern you can hear and trust.
What usually goes wrong
The same problems come up in lessons every week. Some are mechanical, but you hear every one of them immediately.
- Finger sliding: notes smear together and the line loses definition
- Tense thumb anchoring: the thumb sticks, then the wrist stiffens behind it
- Wrong finger on black keys: the hand has to reorganize in a hurry, which breaks the pulse
- Tracking every note consciously: the player never settles into a repeatable motion
There is a real trade-off here. More advanced fingering options can help experienced players reach faster tempos or fit awkward contexts, but they also ask for a looser wrist and better timing. For most beginners and intermediate players, the standard pattern works better because it stays organized under pressure. That matters more than cleverness.
The test is simple. If the fingering lets you play evenly enough to hear each half-step clearly, keep it. If the pattern creates tension or covers up the sound, change it before you chase speed.
Your Daily 10-Minute Chromatic Practice Routine
A good chromatic routine should leave your hands looser and your ears sharper, not just tired. Ten focused minutes is enough if the work is clear and repeatable.
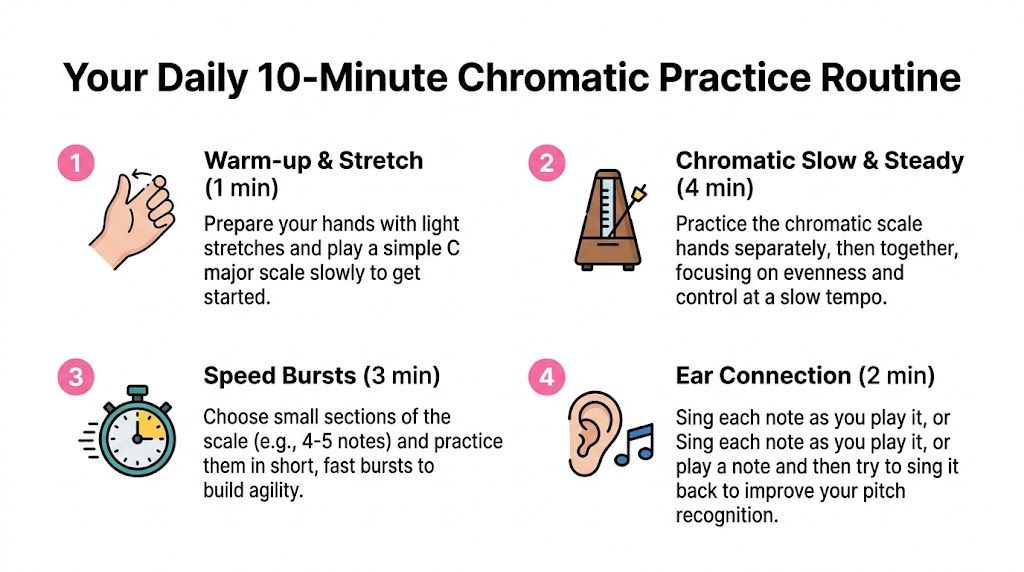
This routine trains two things at once. Your fingers learn an even motion, and your ear learns to recognize each half-step as a real sound instead of a blur.
The routine
-
Wake up the hand
Start with one minute of easy movement. Roll the wrist, let the fingers rest on the keys, then play a familiar scale slowly. The goal is not stretching. The goal is to check that the hand feels free before the chromatic pattern starts.
-
Practice hands separate
Spend four minutes with one hand at a time at 60 BPM in quarter notes. Play one octave slowly several times, listening for equal tone and clean note changes. If 60 feels rushed, drop lower. A slower tempo with full control builds more than forcing a speed your ear cannot track.
-
Add short bursts
For three minutes, keep the range small. Use four- or five-note chromatic groups and repeat them evenly. Then connect two groups. Players usually clean up bumps in the thumb and uneven black-key attacks at this stage, without getting lost in a long run.
-
Put the hands together
Use the last two minutes to combine the hands at the same calm tempo. Starting in contrary motion from D can help because the layout sits more symmetrically under both hands. If that setup feels easier, use it. If another starting note exposes a weakness, practice that too.
Tempo rules that keep you honest
Raise the metronome only when the sound stays even from beginning to end. I tell students to earn speed by keeping the tone matched, the pulse steady, and the wrist quiet.
In piano exams, uneven chromatic scales are a common reason for mark deductions. The same problem shows up outside exams too. If the thumb starts clunking or the wrist hardens, the tempo is too high for useful practice.
A simple increase works well. Move up by 4 BPM only after a clean, relaxed repetition. If the line tightens, return to the last comfortable tempo and rebuild there.
What to do inside the 10 minutes
| Time | Focus | What to listen for |
|---|---|---|
| 1 minute | Warm-up | Loose hand, calm wrist |
| 4 minutes | Hands separate | Equal tone, clear half-steps |
| 3 minutes | Short bursts | Clean groups, steady pulse |
| 2 minutes | Hands together and ear check | Can you hear and sing the line? |
Two fixes that help immediately
- Shrink the problem. If one spot is uneven, isolate four or five notes and repeat that group until it sounds settled.
- Hear before you play. Pause for a second and internally hear the next note group before your fingers move. That habit feeds directly into ear training for playing by ear on piano.
Slow practice builds the sound you want at full speed.
Stay consistent for a week and the change is usually obvious. The hand stops reacting note by note. The ear starts expecting each half-step, and that is when the chromatic scale begins to help with improvising, transcribing, and finding notes by instinct.
Connecting Your Fingers to Your Ears
A lot of players can run a chromatic scale cleanly in the practice room, then miss the same sound completely when it shows up in a melody, a fill, or a solo. That gap matters more than speed. If the ear is not tracking each half-step, the hands are only repeating a pattern.

Sing the line you play
The fastest fix is simple. Sing along while you practice the scale.
The singing does not need to sound polished. It needs to be accurate enough that you can feel each note rise or fall by one half-step. That is what teaches the ear to expect the next pitch before the finger lands.
Try a few short drills:
- Play three chromatic notes upward, then sing them back without looking at the keys.
- Play four notes downward, pause, and hear them internally before repeating.
- Stop on a random note and sing the nearest note above it, then play to check yourself.
- Reverse direction and sing the nearest note below.
I use this with students who say they want to play by ear but still depend on key shapes. Once they sing first, their phrasing improves, their note choices get quicker, and wrong notes stop feeling random. They can hear why a note works or clashes.
Hear chromatic motion in actual music
The next step is to catch this sound outside the exercise.
Chromatic movement shows up in places players often overlook:
- passing notes between chord tones
- bass lines that move one key at a time
- blues and jazz phrases that approach a target note from above or below
- pop melodies that build tension with a step-by-step climb
That is where the scale starts becoming useful. You stop treating it as a drill and start recognizing it as a sound.
If you want more structure for that listening habit, this guide on ear training for learning to play by ear on piano gives you practical ways to turn recognition into a daily skill.
Here’s a short lesson that can help reinforce the sound in context:

A better test than naming notes instantly
Many learners judge their ear by the wrong standard. Instant note naming is only one narrow skill, and it is not the one that widely assists in improvisation or picking out songs.
A more useful test is practical:
- Can you hear that a line moved by the nearest step?
- Can you tell whether it went up or down?
- Can you find that move on the keyboard without trial and error?
Those three skills are the essential bridge between technique and musicianship.
The ear gets sharper through daily repetition. What sounds vague at first becomes familiar, then predictable.
Once that happens, the chromatic scale is no longer just finger work. It becomes a way to hear tension, find notes faster, and trust your ears when you play.
From Mechanical Scale to Musical Freedom
The best result of chromatic practice isn’t a faster scale. It’s a freer musician.
Once the sound is in your ear and the movement is under your fingers, you start noticing chromatic motion everywhere. It shows up in fills, transitions, bass movement, melodic tension, and improvised runs that used to feel out of reach.
That’s why this work matters.
You’re not practicing a scale so you can say you practiced a scale. You’re building a direct path between hearing and playing. That path is what lets you respond in real time, pick out notes faster, and make music feel less like decoding and more like speaking.
Keep the daily routine short. Keep the listening active. Sing what you play. Notice half-steps in songs. Let the keyboard confirm what your ear is already starting to understand.
Over time, that’s how ear training becomes practical. That’s how “I wish I had perfect pitch” turns into “I can hear what’s happening.” And that’s how a mechanical chromatic scale on piano becomes part of your real musical vocabulary.
If you want a simple daily system for ear training, chord recognition, interval work, and learning to play by ear, Trill: Ear Training Daily is built for exactly that. It’s designed for short, focused practice, so you can train your ear in 10 minutes a day and turn listening into a real playing skill instead of a vague goal.