Practice Chords for Guitar: Hear Them Before You Play
Can you recognize a chord when you can’t see the fingers playing it? If you can copy a diagram but lose the beat while changing shapes, memorizing more diagrams won’t solve the whole problem.
To practice chords for guitar effectively, connect what you hear, where your fingers go, and when the chord arrives. You’ll measure clean changes and chord recognition separately, then bring them together in music. Ear training isn’t a talent test. It’s a skill you can practice alongside your guitar technique.
Table of Contents
- A 10-Minute Daily Routine for Clean Chords
- How to Build Clean Shapes One Pair at a Time
- Switch Between Chords Without Stopping
- Hear the Chord Before You Fret It
- Move One Shape Across the Neck
- Fix the Problems That Stall Your Chord Changes
- Start Tomorrow With the Ten-Minute Routine
A 10-Minute Daily Routine for Clean Chords
Daily ten-minute chord session
| Block | Minutes | What You Do | Done When |
|---|---|---|---|
| Listen | 2 | Play one chord and name its quality (major, minor, seventh) by sound | 5 of 5 named correctly |
| Switch | 3 | Alternate between two chords on a metronome pulse at a slow tempo | 9 of 10 changes land clean |
| Identify | 3 | Play a chord you hear without looking at a diagram, then check | 4 of 5 guesses right |
| Review | 2 | Log the slowest change and repeat it once | Result written in the log |
Treat these pass marks as practice targets, not promises. Stop each block when its time ends, even if you haven’t passed yet. Before every block, listen to the target chord and name its quality before placing your fretting hand.
For Listen, use recorded examples or an exercise that hides the answer. Say major, minor, or seventh, then check. If you already know which chord you’re playing, you’re rehearsing its sound rather than testing recognition.
For Switch, choose a pulse slow enough to prepare the next shape before the click. Count a change as clean only when the intended strings ring and the chord arrives on time.
For Identify, hear the example, predict the chord, and find it on the guitar. Check the diagram afterward so you don’t turn listening practice into visual copying.
For Review, write down the difficult direction, such as C to G rather than just G and C. Repeat that change deliberately, without squeezing harder or rushing.
Make the session easy to repeat
The International Clarinet Association’s practice guide explains that ten focused minutes on a defined objective can be more effective than an hour without a goal, when practiced consistently. That doesn’t establish a guaranteed improvement from exactly ten minutes daily.
Keep these tools ready:
- Tuner: Check every string before blaming your fingers.
- Metronome: Use its audible click and visual pulse to expose late changes.
- Chord visualizer: Confirm the shape after naming the chord by sound.
Use a log with date, chord pair, clean changes out of ten, changes completed in one minute, and one note. During review, time a minute of the transition and record completed changes, noting any errors beside the score.
For a manageable first week, use the same pair on five days. Look for a rising clean-change count, not a new collection of shapes.
How to Build Clean Shapes One Pair at a Time
Choose a pair you’ll use in a song. A clean isolated chord is useful, but you also need to retrieve its sound and reach it from another shape.
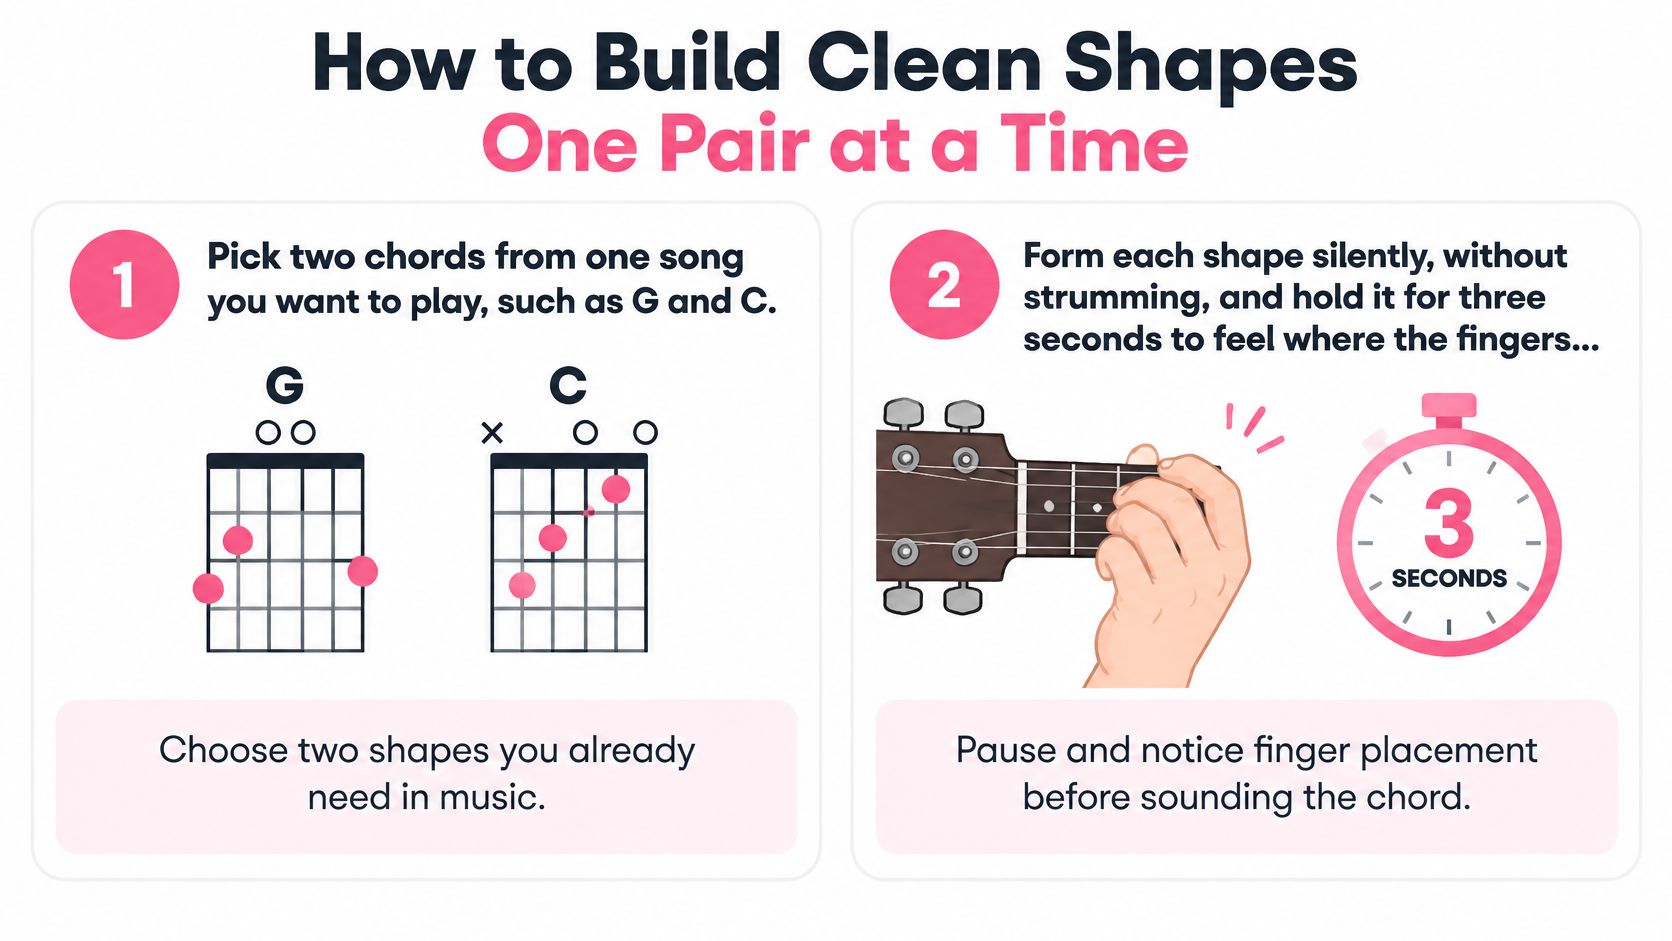
Use this process to connect the shape with the sound.
-
Pick two chords from a song you want to play. G and C are a useful example if they appear in your chosen song. Listen to both before practicing so you have a sound to aim for.
-
Form each shape and hold it for three seconds. Notice where each fingertip lands and whether your wrist feels comfortable. This pause is a placement check, not a strength exercise.
-
Strum each chord once at a slow, steady pulse. Check the strings that belong in the chord rather than assuming every string should sound. If something buzzes, inspect that note before repeating the whole grip.
-
Alternate the chords on a four-beat count, then stop watching the fretboard after five repetitions. Keep the timing simple while you test whether your hand remembers the route. If removing your eyes causes a breakdown, slow down rather than immediately looking again.
-
Hear the target before you fret it. Use a hidden recorded example, name what you hear, and then form the shape. Without a recording, imagine the target sound first, but remember that this tests sound recall rather than independent identification.
-
Advance only when changes remain clean across several short trials. Use 90 to 95 percent clean changes as your working threshold, then test without watching your hand and at a less familiar tempo. Don’t increase speed just because the last attempt felt easy.
-
Return to the pair later that day and the next day. Gradually leave longer gaps between successful attempts. Begin each return with a recall test before opening the diagram.
Test what survives a break
A musical memory experiment on spaced learning found strong retention benefits after a three-week delay. It tested melody learning, not this exact guitar routine, but it supports separating practice sessions instead of relying on a single long block.
Repeated attempts can feel fluent because the previous movement is still fresh. The more useful question is whether you can retrieve the shape and sound after doing something else.
Practical rule: Don’t count a shape as learned just because you can copy it. Test whether you can hear its target sound and form it without looking.
Use the guitar chord visualizer to check an uncertain fingering after attempting recall. The diagram should answer a specific question, such as which string to mute, rather than guide every movement.
Switch Between Chords Without Stopping
Each transition needs direct practice. A comfortable C to G change doesn’t prove that D to A will feel equally coordinated. Experimental motor-learning work on chord production found that learning was largely specific to the practiced chords, rather than automatically transferring to unfamiliar ones.
Use the following targets as a training ladder. Move up only when you can meet the pass mark without tension or hidden mistakes.
Transition practice stages and pass marks
| Stage | Drill | Pass Mark |
|---|---|---|
| 1. Silent change | Move between two shapes with no strum, fingers preparing together | 10 of 10 changes with no pause |
| 2. One strum per beat | Strum once on each chord at a metronome pulse | 9 of 10 changes land on the beat |
| 3. Continuous strumming | Strum steadily through every change without stopping | Count changes per minute and beat your last score |
| 4. Mixed pairs | Mix three chord pairs in random order, then test at an unfamiliar tempo | 90% clean across three trials |
During silent changes, examine the route. Keep a finger in place when the next chord permits it, and prepare moving fingers together rather than building the chord fingertip by fingertip.
With one strum per beat, listen for whether the chord begins with the click or trails behind it. A clean chord that arrives late hasn’t passed the timing test.
For continuous strumming, keep the strumming hand moving through the change. Beat your previous count only while preserving clean sound and steady rhythm. A higher score with more missed beats isn’t progress.
Measure the landing, not the effort
Record a sample of changes and inspect both accuracy and transition time. Use video if necessary to see when the hand leaves the old shape and settles into the new one. The median transition time, the middle result after ordering the times, is more informative than your single fastest attempt.
Mixed practice tests whether you can select the right movement rather than repeat a memorized loop. Call out different chord pairs or shuffle written prompts, then play them without rehearsing the order first.
Watch for these habits:
- Excessive lifting: Move fingers only as far as necessary to clear the strings.
- Comfort-only practice: Spend time on the change that interrupts your song, not just the pair you enjoy.
- Speed camouflage: Return to a slower pulse if buzzing disappears only because the next strum covers it.
Before a transition, listen internally for the destination chord. Your hands should be moving toward a known sound, not merely the next diagram.
Hear the Chord Before You Fret It
Play a familiar reference chord, then listen to an unknown example. Before naming it, describe the difference: brighter, darker, more tense, or more settled. Those descriptions aren’t fixed definitions, but they give you something audible to compare.
Keep the visual guide out of view during the first listening attempt.
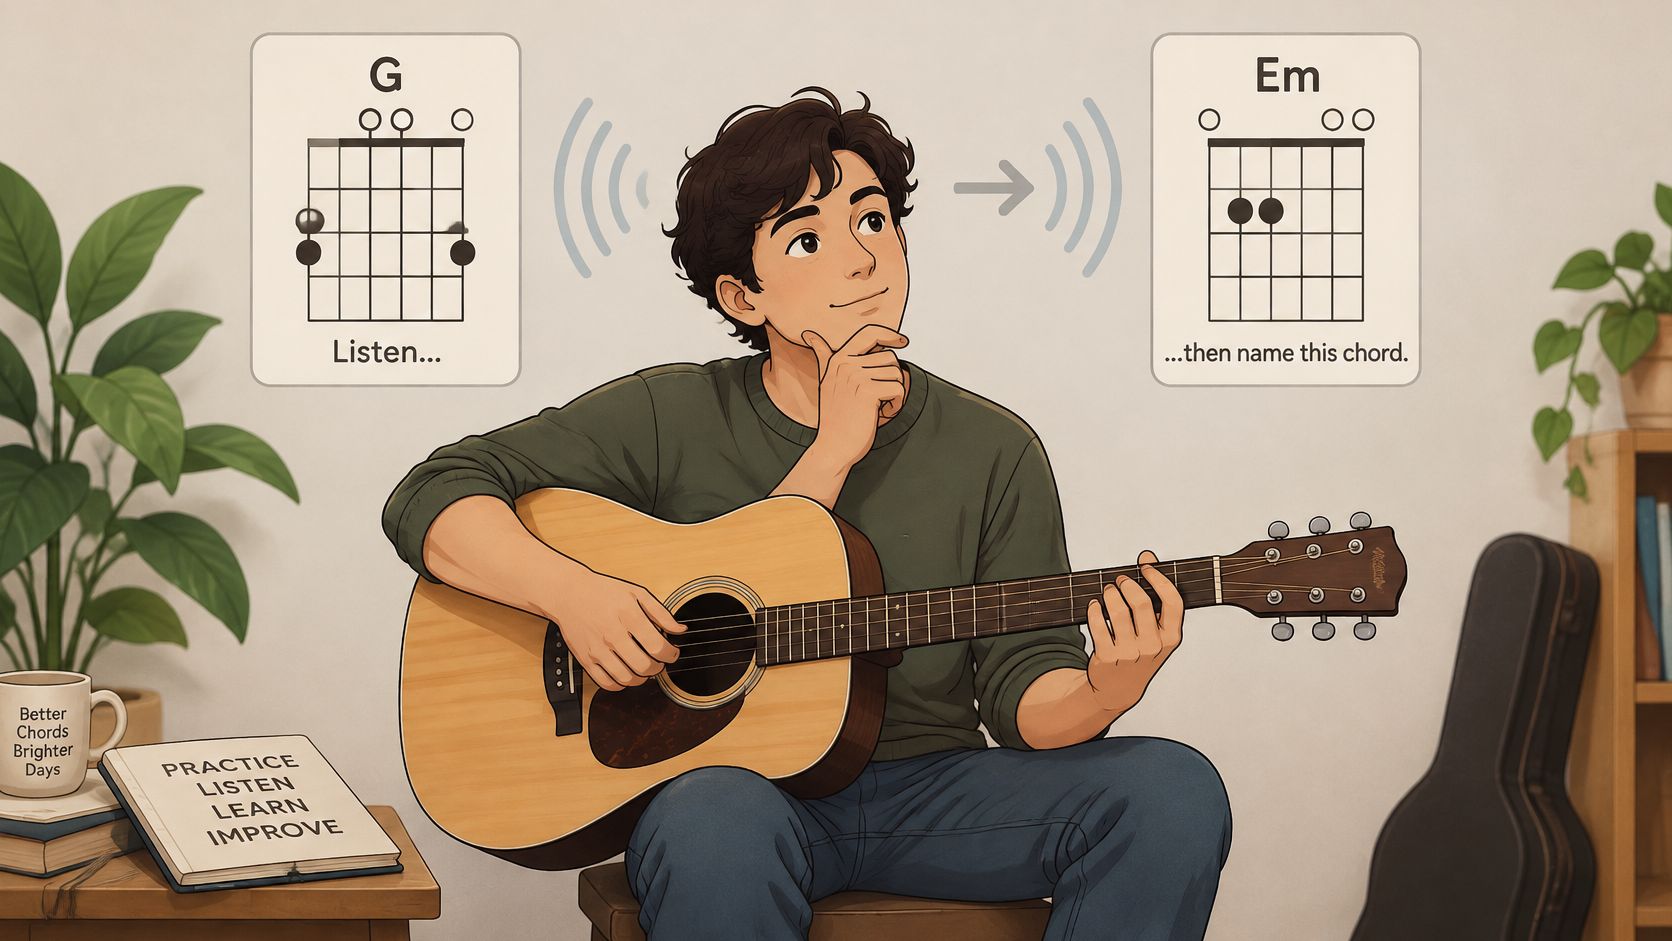
Start with major and minor examples sharing the same root. Then introduce seventh and suspended chords. Our chord training covers major, minor, seventh, sus chords and inversions, so you can practice hearing beyond the first familiar open shapes.
An inversion changes which chord note is lowest. Listen for that bass movement without assuming every change in the bass means an entirely different chord.
Use a reference, not a lucky guess
Try hear, predict, play, check. Hear the bass note first, predict a likely chord quality, play your candidate, and compare the full sound. The bass note helps orient you, but it can’t tell you major or minor by itself.
You don’t need perfect pitch to play by ear. Relative pitch means hearing relationships from a reference, such as how a new bass note sits against the previous one. Pair that with chord-quality recognition, and you have a practical route into finding songs.
A Wilktone account of adult pitch training describes 12 musicians without perfect pitch completing at least 25 hours of exercises over eight weeks, averaging more than two hours weekly. Participants identified an average of just over seven of the twelve chromatic pitches with at least 90 percent accuracy, and three reached all twelve.
That study tested pitch identification, not guitar chord recognition. It shows that adult listening skills can improve through training, but it doesn’t promise the same result from ten minutes daily.
Use this listening demonstration as another opportunity to compare sound before reaching for a shape.

Ear training is practice in recognizing what you hear, not practice in making faster guesses.
Finish with a daily check: identify three chords in a row from sound alone and log how many were right. The ear-training guide for guitarists can help you connect listening exercises with instrument practice.
The outcome is practical: hear a chord, find a likely location, and confirm it with your ears.
Move One Shape Across the Neck
Movable shapes work because the tuning preserves relationships between strings. Standard tuning runs E, A, D, G, B, E, from lowest to highest.
The guitar chord reference explains that four neighboring string pairs are perfect fourths, or five semitones, while G to B is a major third, or four semitones. It also describes four movable major-triad shape families and three common C-major shapes. That tuning break explains why shifting a shape across strings sometimes requires a fingering adjustment.
Look at how a shape travels along the neck.
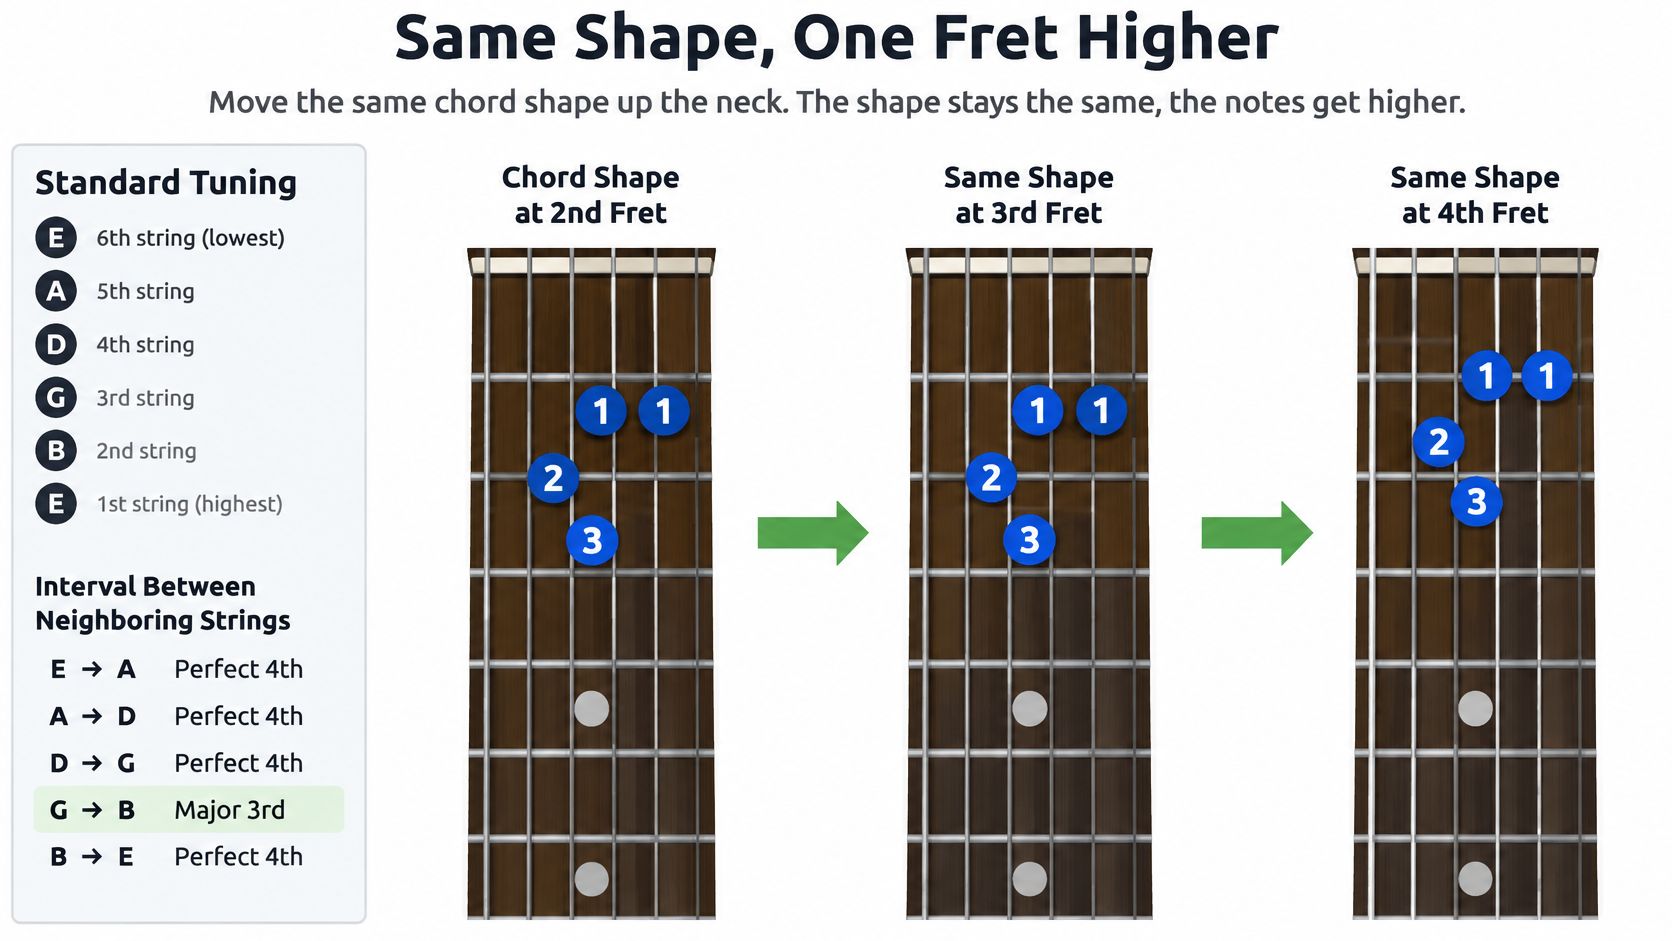
Move the shape and predict the sound
For a practical example, use an E-shape major barre chord. Its root sits on the low E string: barre at fret five for A major, then move to fret seven for B major. Keep the full shape intact, including replacing the open-string nut with your barre.
Try this listening-led transposition drill:
- Establish a reference: Play the starting chord and sing its root.
- Choose new positions: Move the same shape to three different frets.
- Predict before playing: Name the intended chord using the root location, then imagine its sound relative to the reference.
- Check by ear: Strum and compare what you heard internally with what you played.
Without perfect pitch, you’re not expected to name an unheard absolute chord from nowhere. Use your reference and fretboard knowledge together.
The same chord can also appear in different voicings, with a different register, spacing, or bass note. Compare those versions by listening rather than assuming identical names mean identical sound.
Learn comfortable open shapes before demanding movable forms. Use guitar fretboard flashcards to strengthen root-note recall, then confirm the resulting chords by ear.
Fix the Problems That Stall Your Chord Changes
Chord change symptoms, causes and fixes
| Symptom | Likely Cause | Fix |
|---|---|---|
| Buzzing or muted string | Fingers too flat or too little pressure | Pick through each string one at a time and adjust finger angle near the fret |
| Stop between chords | Lifting fingers far from strings or forming them separately | Keep fingers close to the strings and prepare the next shape early |
| Late landing on the beat | Shape formed after the strum, not before | Run the silent change drill, then add the metronome |
| Guessing the chord | Relying on diagrams instead of sound | Identify the chord by sound before fretting it |
| Speed hides mistakes | Practicing faster than the clean tempo | Slow down until 90% of changes are clean |
| Chord sounds wrong | Major and minor mixed up | Compare with a reference chord and name the quality by sound |
Name the symptom before changing your technique. Buzzing, lateness, and wrong chord quality are different problems, even when they happen during the same change.
For buzzing, isolate the affected string. The Musician Tuts guitar-chord guide recommends checking strings individually to locate muted or buzzing notes. Adjust fingertip placement near the fret before adding pressure, and check whether a neighboring finger is touching the string.
Stopping requires a different fix. If you release the old chord, pause, and then assemble the new one, you’re rehearsing a break in the music. Remove the strum temporarily and practice preparing the destination shape before its scheduled arrival.
When your ear and hand disagree
A cleanly fretted chord can still be the wrong chord. If you intended major but played minor, more finger pressure won’t help.
Recover with a sound-first loop:
- Locate the bass: Sing or play the lowest note you can hear.
- Describe the quality: Compare major, minor, suspended, or dominant sounds against familiar references.
- Test a candidate: Play the shape and listen to the whole chord.
- Explain the mismatch: Decide whether the bass, quality, or voicing differs before trying again.
Our musician toolkit includes a tuner, metronome, and chord, scale and interval visualizers. Use each for a specific diagnosis: tuning, timing, or checking a relationship you’ve already tried to hear.
Recovery check: Don’t repeat the same wrong answer more confidently. Identify what sounded different.
Placement adjustments may produce an immediate improvement, while reliable chord identification needs repeated listening over time. Don’t impose a fixed deadline on either skill, and stop if your hand hurts rather than treating pain as necessary practice.
Your final test combines the separate checks: the chord arrives on time, every intended string rings, and its quality matches the sound you meant to play.
Start Tomorrow With the Ten-Minute Routine
Commit to fourteen days as a practice experiment, not a deadline for mastery. Choose I–V–vi–IV, which in G is G, D, Em, C, and begin with G to D.
Write a start line tonight: day, practice time, starting pair, and the clean-change score you want to beat. Keep the guitar ready so tomorrow’s decision is to begin.
Give the habit clear stages
- Days one to five: Keep the same pair and work toward a rising clean-change count.
- Days six to ten: Add Em, the third chord in the loop, if the opening transition stays controlled.
- Days eleven to fourteen: Add C and attempt the full loop with the metronome. Name each target chord from a hidden audio prompt before strumming.
Trill is an ear training app covering chords, intervals, perfect pitch and melodies, designed around ten-minute daily practice. Its progression training includes I–V–vi–IV and similar progressions. When you start, you tell us your goal and level, and the journey adapts from single notes to full chord progressions.
Use the app as a daily training system, then apply the listening work on your instrument. An app can support the habit; the guitar changes still need practice on the guitar.
Look for faster chord naming, cleaner timed changes, and progress toward finding a simple song by ear. Those are outcomes to test, not guaranteed results after two weeks.
On day fourteen, review your log and record the loop. If accuracy and timing hold, choose a harder progression; if they don’t, keep the difficult pair and simplify the task.
Build the listening side of your chord practice with Trill: Ear Training Daily, which offers short daily training in chords, intervals, pitch and melodies. Start with chord recognition, then bring each sound to your guitar and test whether you can find it without a diagram.